Frozen Adapted Book with Symbols

I don't know about you, um, your class, but we are OBSESSED with Frozen right now :) So, of course, I bought this Step into Reading level 2 book A Tale of Two Sisters from Amazon (affiliate link) and added reading support symbols for my students. I love how adding symbols to a page gives my students SO much more confidence while reading and makes the task so much less daunting. Shoot, reading is even fun!!
Plus, the book itself is a pretty high motivator! If you happen to purchase this book as well, you can download the adapted symbols for A Tale of Two Sisters. Enjoy!

To put it all together, all I did was cut and paste the sentences directly over the words. Everything fit great and I didn't have to cover up any pictures. Plus, no laminating since I'm not adding removable pieces to this book. (update: I underestimated how much my students would love this book. It has since been laminated to keep it from falling apart!)
 Adapted Book - frozen
Frozen adapted book for special education 
Now, let's all sing "Let it go". Hm, now that could be a great starter for a behavioral social story, or song! Anyone up for writing it? :)
4

DIY Texture Books (FREE)

I love these DIY texture books for both a student activity and to store in our classroom library. These texture books work on both reading and writing skills, plus the additional sensory aspect may motivate students to read!

This past month, we focused all of our art activities on texture. These activities included painting with texture paints (adding sand, glitter, baking powder, shaving cream, etc), filling balloons with different materials, and - my favorite - creating these texture books!
I created these books on PowerPoint and then set them to print as half pages using this tutorial from Kara at Sped-ventures (thanks Kara - printing like that has changed my life!) I also printed the pages on card stock so they would hold up a little better with the materials we would add to the book.

For the cover page, I gave each student a handful of foam letters and they had to find the letters of their name. If they didn't have a letter in their pile, they needed to ask their classmates for help in finding that letter. This worked out great! 

For the beach page, students covered the sand with glue and then chose between the light or dark sand to sprinkle on the paper. We did this over a container so we could re-use the extra sand that didn't stick to the glue.

For the table, we added craft sticks (you could also use Popsicle sticks as well) to the top of the table. Some students added one to the bench as well.

We added a soft feather to our birds. Each student picked their color and then we explored with the feathers a little before we glued them on our page. We "tickled" ourselves with the feather on our arms and our face. We watched it float to the ground, etc.

This next one isn't exactly a "texture" - but I was pretty lenient with that term as I could only think of so many things! And we still did add "texture" to our book. For the mirror is shiny, we glued on a rectangle of aluminum foil (also quickly talked about the dull and shiny side of foil).

Since we have a gazillion bumpy and terrible roads after this winter, this next page seemed all too fitting. For "The road is bumpy." we added crinkled up black paper and then added the white lines down the middle.

We all had a blast with our squishy worms! We used long skinny balloons, like you would use to make balloon animals (oh, the random things I find in my classroom) and filled them up with a quick squirt of shaving room. Really emphasizing the QUICK or you will have huge shaving cream bubbles in your worm and it will probably explode everywhere. We then stapled the part before the knot (if you staple after it the shaving cream will come out) to keep the worm on the page, and some students also glued the tail on the page, so it wouldn't fall out of the book. Another option to fill the worm was sand.

And the fluffy bunny, complete with a cotton ball tail.

We then put two holes on the left side of each page using my 3-hole punch (these are half size pages, so two of them fit on here perfectly) and then students threaded their yarn through the pages and we tied them at the back with some slack so that the pages will turn easily.

Students filled in the texture word for each student to the best of their ability, some students cut out the printed words and glued them, others cut out traced words and then traced them, and still others wrote the words in by themselves.

Download the book here as a PowerPoint. I'd love to hear if you use this with your class. And I'd love to see picture of how yours turn out! Feel free to share on my facebook page or tag me on Instagram @BreezySpecialEd!
I'm sure there are a bunch of other pictures and textures you could use to add even more pages to this book. Do you have any other ideas? Please share in the comments so we can all benefit from your brilliance! 
6

Community trip - Bowling unit for Special Education

Last month our community trip was to go to a bowling alley. Before we went I wanted to make sure my students understood the basics of bowling as well as the social skills needed for bowling, so we had some fun during our resource class exploring these concepts.


First, we went through a coloring book.
special education bowling community trip
This book has descriptions of different bowling terms (strike, spare, gutter ball) as well as concepts like waiting for friends and cheering for our friends. We went over this as a class and made it into a following directions activity as well (Such as color the pins red, color the shirt blue, etc).

I also threw in some math concepts, such as this number matching 1-10 cut and paste activity.

And also a money worksheet where students have to color in the amount of money needed to buy each item that you might find at the bowling alley. I'm sneaky hiding these math skills into fun bowling worksheets :)

Then we had this social skills game that we used two different ways. To introduce I passed out the green cards to students. I then read the blue card and if the student thought their answer fit, they told me what their card said. After we went through the activity as a class, I had students work on these individually as a matching or memory-type of game.
Of course we played some bowling Bingo too :)

special education bowling community trip
As for our actual bowling experience, it went great! I was a little nervous when some students would step just about over the line into the slippery lane, but luckily no one fell! Also, we were right by the center so when we had balls that were rolling way too slow we were able to walk up and grab them which was really helpful. And check out that high five. That was all natural (aka we didn't tell them to high five and I didn't stage it - which I do sometimes so I can use the picture as a teaching tool) and I am SO proud of that high five and he's proud of his strike! :)
If you are interested in the learning materials we used, you can find these (and more) in this Bowling Unit in my TpT Store.

Anyway, it was a great experience! Have you taken your students on a bowling trip? If not, you should really think about it! We had a blast!
0

Planning Community Trips for the Year

How to plan out community trips for the school year for special education and life skill classes'
Planning community trips was always so stressful for me, at least my first two years teaching. Each month, I'd think I should probably plan a community trip...but only ended up planning a few because other things always came up and I focused on those instead of trying to plan a trip. At the beginning of this year I decided, as a high school life-skills teacher, I need to make sure community trips were part of my curriculum. In August I planned a calendar of community trips I thought we could go on. In the beginning, I wanted to start with something simple, so it was just a short and sweet trip to McDonald's. Once my students had more exposure and were used to going on community trips, I figured they'd be able to handle more which is why towards the end of the school year I have us going to both a store and a nearby fast food restaurant in the same trip. 
 And I have to mention that looks might be deceiving...this is not the same calendar I started out with in August. I would scratch things out and move trips around, but since I like things to look neat, I would then update it and print out a new one. 

I also like having this prepared ahead of time, because I then work on lessons that go with our community theme.

Fast Food Restaurants: For McDonald's and Wendy's we used this fast food unit. We also spent time looking at their websites and their online menus. I created a visual menu from the dollar menu to help my students choose items while staying in their budget as well as a scavenger hunt in case we had some time to kill - you can see those things here. It was also helpful to use our environmental print Fast Food book and worksheets.

Sit Down Restaurant: For Denny's we prepared by reading some books I had about sit-down restaurants. We looked at the Denny's website at their menu, logo, and location. We also practiced by having a restaurant in class with menu items of chips and pretzels. Afterwards, I created this book that my students continue to read. During language, I have my student identify restaurants in their community based on their logos.

Dollar Store: The Dollar Tree website was great to look through and they had cool videos that we showed as well! I also really enjoy that at a dollar store, everything is a dollar, so it makes it easier for students to budget. We practiced picking out items and counting how many items we had to know how many dollars we needed, adding one dollar at the end for the tax. 

Mall trip: Every year before Christmas, my program takes our students to the mall to go shopping for presents and we get to watch a movie and eat at the food court too! We were able to go to the mall's website to get some background knowledge and I printed a map of the mall and we matched logos for the bigger department stores. I blogged about our experience last year here

Stores: Since they were all right next to each other, we went on a trip to ALDI, Five Below, and PetSmart. I had students complete "research projects" like the ones found in my Store Environmental Print packet. The students had to trace the name of the store and then cut and glue items from ads I brought it or ones that we found online of things they could find at those stores. We also went through a PowerPoint of actual stores that I found on Google images, so students could get used to recognizing the logo on actual buildings. The materials I used to teach these three stores you can download here for free. We used this Taking Care of Pets unit to prepare for PetSmart.

Bowling: More details to come in a post soon, but I used this bowling unit to help my students prepare for this trip. Update - read about our bowling preparation and trip here.

Thrift store: I'll admit, I really wanted to play "Thrift Shop" for my students....but even the clean version sounds a little dirty, so I didn't feel comfortable enough doing it. Sad day! I hope to create materials that I can use next time for this trip, but for this time we just went on Google images and talked about the Goodwill logo and how you can buy "good" stuff at Goodwill. We discussed donated and buying things cheaper, and how they have a lot of different things there. My students are excited to look for video games.

Update: Library - see post and materials HERE and Ice Cream trip - we used this unit!

Now, when a new month comes up, I check my community calendar, see if there is any conflicts with the date I suggested and then fill out the necessary paperwork for that event. I don't have to "think" which is SO helpful! :) And therefore we guarantee that we will have a community experience each month.

Need help preparing your students before they go out in the community? Grab this Community Trip bundle and receive 8 different trip units all planned for you!
6

More Work Task Boxes - part 3

And, yes, here's more work tasks for you to check out. If you missed my other work task posts, check them out here and here for more info on our independent work task station.

I got a bunch of CDs from free-cycle and went through them to find the CDs that look similar to the covers to create this matching/packaging task.

Pipe cleaners and pony beads. Pretty self explanatory, student matches color and strings on the beads.

These were leftover from a Halloween party, and I almost threw them out when I noticed some of the handles had fallen off. Yes! It has now turned into a great assembly task by put the handles back on the skulls! :)

Next I have sorting tasks with Velcro with a variety of different categories. These categories sets come from Erin - Adventures in Tutoring and Special Education. Thanks Erin! :)

I also use these and other task cards that can be answered with a dry erase marker. This specific set works on knowing which bill is worth more and can be found here.

This task is sorting bumpy frogs from smooth frogs. I added bumps on the bumpy frog visual and container by using Elmer's glue and allowing it to dry. I really like this task because it's not something students are used to sorting so it really makes them think. This would also be a great task for visually impaired/blind students.

For more work task box ideas, check out
1

Kitchen Vocab Unit for student with Special Needs

I love this new kitchen unit that I have created for my students! It is simple and very basic, focusing on six main kitchen appliances (oven, fridge, microwave, toaster, blender, and dishwasher). When teaching some of my students how to cook this year, I realized some did not know these items yet. And it's kinda hard to teach students who to use the microwave when they don't know what it is yet! :)

Included in this packet is:
  • 3 sets of Flashcards (Color, B&W, Word, and activities/questions to use with flashcards)
  • 6 pages of Matching activities (Picture to Picture, Picture to B&W, Picture to Word) *First one of each set includes lines for students to trace
  • 2 Cut and Paste Matching activities
  • 2 Tracing (ABC & abc) pages and 1 Writing page
  • 6 pages of Identifying the appliance (circle all ____)
  • 8 half pages to create a Vocab Coloring Book (color picture, trace word)
  • 2 File Folder activities (matching picture to picture, matching picture to word)
  • 1 Data Sheet (with graph for student to measure their own progress)
I put the worksheets in my students' binders for them to complete during binder time, and we use the flashcards in both our language and binder time as well.

The directions on the worksheets include pictures to help non-readers understand how to complete the worksheets independently. And worksheets are differentiated so most students are able to access the worksheets, such as the dotted lines seen in the worksheet below.

And of course I had to include a file folder, because it's such a sneaky way to get my students to practice working on skills because for some reason, they think all file folders are fun games! :)

Head on over to TpT to check out this packet for yourself!
3

Teaching Age Appropriate Music with Free Downloads!

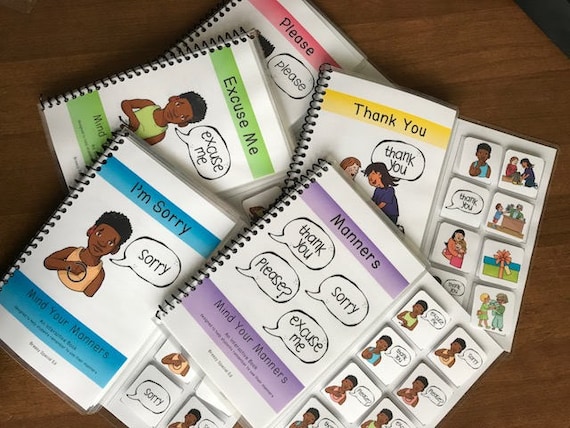
It's no secret that I love my fine arts classes this year. I have to restrain myself from posting all of the art projects we do...but they are pretty awesome.

Our fine arts schedule is two days of art, one sensory day, and then two more days of music. I wasn't as excited for music in the beginning of the year, but we have gotten into a grove and it might be my favorite now!

Each month we study a different kind of music. In August we started with our school song and then local sports songs. Since then we have done country music, dancing music, Disney music, Christmas music, classical music, and most recently pop music. I store our visuals for each month on our fine arts board.
I created PowerPoints for each month with four songs per page. I usually copied and pasted the cover for each song (Google is a good friend of mine) and then hyper linked it to a YouTube video of that song. If I had a smart board, this would be awesome because students could come up and click the song they wanted and the video would automatically show up. However, I would just have them point to the screen, the choice board, or on their device to choose their song. And by linking the videos I know the video is approved and nothing too crazy will come up.

A few of my students have Proloquo2Go on their iPads as a communication device. It was easy enough to add the titles of songs to each student's device, and they are able to request songs that way as well. (And it has been such a motivator for them to use their devices!!)

Some songs we simply listen to (and watch the music video), and others I have an activity to go with. 
 Here's a few examples of our activities to get you started:
Country Music: For Johnny Cash's "Walk the Line" I put painters tape on the floor and during the song we all took turns "walking the line". 
"I'm Gonna Miss Her" - we went fishing with a classroom fishing pole and fish.

Dancing Music: I just made them dance :) It was fun to do the dances with specific moves such as "Cha Cha Slide", "Cupid Shuffle", and "YMCA"!

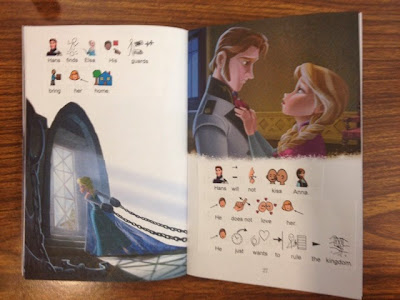
Disney Music: I did this one a little differently. I showed the PowerPoint slide and "froze" it on the screen, then I would play a song and they would guess what movie it came from.

Christmas Music: 12 days of Christmas, we printed off pictures for each day and students had to hold up the picture when it got to their part. 

Classical Music: We focused on certain aspects such as soft/loud and would pretend to sleep during the soft parts and "wake up" when it got loud. It was hysterical. I loved this site for lesson planning. (No PowerPoint for this one since it wasn't one the students choose. Instead we studied a certain musician/composer each week).

Pop Music: "Counting Stars" - this worksheet, my students had to count the stars. 
"Compass" - used the compass app on our iPads to see how they worked.
"What does the Fox say?" - Coloring page of fox

Download any of my music PowerPoints on Google Drive. Just make sure you open them in Power Point because the links won't work in Google Drive. Enjoy! I would love to know if you use this in your classroom, so let me know what you think! :)
5

March Currently AND Giveaway!!

It's a new month which means it's time for Currently with Farley! Here's what I'm up to right now.
Listening: It's true. Absolutely nothing. But now I am hearing the hum of my heater. Exciting stuff, right?
Loving: My sparkly pink phone case! I spray painted my Otterbox with pink glitter on Saturday. It is awesome.
Thinking: I think we can all be in agreement on this one, yes?
Wanting: Why is meal planning so hard? Why do I hate cooking? Why is my husband such a picky eater? I think a magically meal fairy would solve all of my problems.
Needing: I have Bible Study tonight, which I love! But I am such a procrastinator! I did one of the three lessons this week, now I just need to do the other two because I go :)
?????: Oh. My. Goodness. I bet you could never guess the question....so the answer is at 13.6 grade level. The question is "What level are the reading passages in your state alternative assessment?" I knew they were high, so I typed it into an online readability test, but college level?! To students who have multiple disabilities and who are working on skills like identifying community signs?! Ridiculous.

And I have a giveaway going on over on my Facebook page to win ANY product from my store! Re-pin an item from my TpT Store Pinterest page, then paste the link to your pin on the Facebook link.  Enter as many times as you pin!!
2
(C) Brie Holtrop- Breezy Special Ed. Powered by Blogger.
Back to Top